
Part 3: Phases of the design process explained
"Our processes determine the quality of our products." - Hugh Dubberly
Recap
I opened the series with an understanding of what I mean by a scalable process. Scalable processes divorce the goals of a design phase from the methods and/or techniques used. Since not only are there numerous design methods and techniques, there are also endless flavors of them as well. Each has its place given a particular context and the designer involved. Many design processes in the past often advocated for a particular design method. For example, Karen Holtzblatt’s Contextual Inquiry, originally required a very lengthy upfront research phase that not many designers could do. Consequently, the original version of the process was rarely employed: it was too inflexible to scale to most projects.
Alternatively, some design processes went the opposite extreme and became so vague as to be of very little practical value, like the Double Diamond.
Real sustainability in a design process enforces a minimum standard of professionalism while giving the designer or design manager the guidance to unleash the design team's creativity in an effective manner.
Scalability in an effective design process consists of three elements:
- Timeless design phases that completely cover the design effort
- Universal goals for each design phase (universal meaning, they cover every essential goal of a design project)
- Deliverables that capture the context that support the goal.
The previous blog entry covered numbers 1 and 2; so before going into process details let’s just spend a little time to understand the role of deliverables in the design process.
Deliverables
The deliverables for the design process are suggested here but not prescribed. For example, one deliverable could be a requirements document. It is really dangerous and unprofessional to proceed with a design without understanding what it needs to do, a.k.a. requirements. But there are many ways of documenting requirements, everything from a database to a conceptual map to a prototype. The form is unimportant, the key is all decision-making stakeholders agree on the form and content of the deliverable(s).
One important note: it is vital for the sustainability of the process that a process does not require a deliverable for its own sake. Each deliverable must also be an operational part of the design process, so it is essentially self-documenting. Design projects are usually very intense and have little time for activities of a purely administrative nature.
The deliverables helps reveal project gaps before the project starts. For example, each deliverable should map to a goal. And every deliverable should map to at least one method/activity. So when properly planned, all the goals are associated with deliverables and how those deliverables will get made (activities).
Consequently, in this article, I will suggest deliverables, but they are for illustrative purposes, as many experienced designers will have alternative deliverables and/or formats to cover the same goals.
Detail explanation of the project process details
As we will see in a later blog post on the management of the design process, the phases are divisible into more steps, the challenge being to slice a project into steps that makes sense for the scope of the project. However, it is not recommended to condense the phases to less than the four given below, because each of these phases represents a design milestone that is independent of a design project and grounded in design practice and theory (those practices and theories that makes this a timeless process will be in the next blog posts). For this post, we just focus on the four phases and their details. For each step we will use the following structure:
- Definition and explanation
- The universal goals
- Example deliverables that support the goals
- Optionally, some example activities that support the deliverables
The Project Design Project Process Steps
First to just review, these are the steps iin the design process:
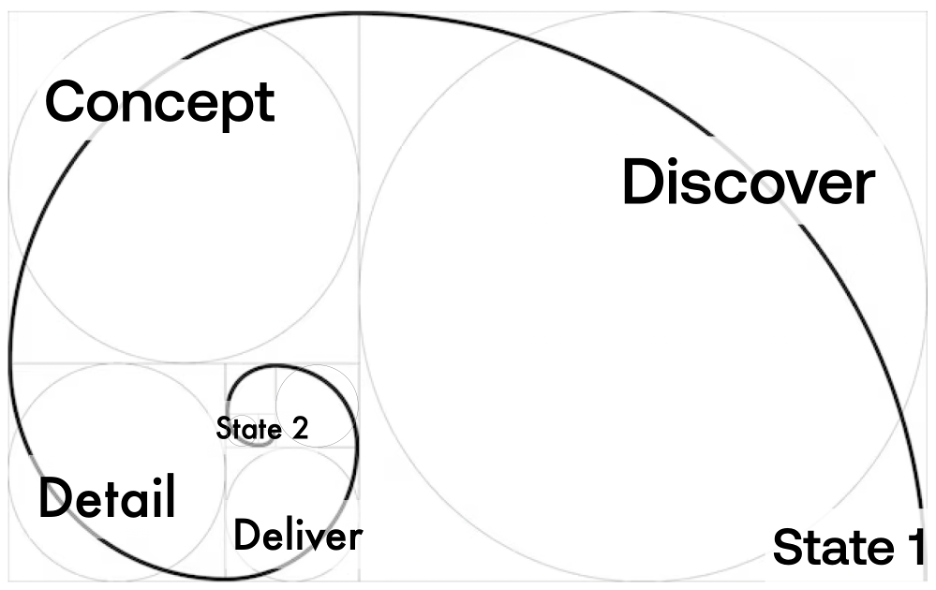
The steps of the process to be detailed are:
- State 1 — the status quo before design is started
- Discover — understanding the challenge
- Concept — determining the conceptual solution
- Detail — detailing the solution direction into a concrete design
- Deliver — implementing the design in partnership with engineering
- State 2 — the desired ending state of the design.
State 1: The Status Quo
The first spot in our process roadmap is a pre-condition, or the status quo, at the start of the design process.
State 1: while it is the state before design begins, it is not necessarily the beginning of a software project. More often this is the state of the software when design becomes first involved.
Even if it is at the beginning of a software project, it is still quite common that Step 1 is not a clean slate. There are usually already some legacy decisions, resource limitations and other constraints within which the process must operate.
Goals
The main goal of State 1 is the understanding of the current state of the software project. Namely:
- Review and explore the existing software solution, if there is one.
- Understand the activities already underway: why were they done and what evidence are they based on, etc.
As we study the current state, we can find that in this original state some design may already exist. Work worthy of learning from and maybe reusing.
There is usually much valuable data to be mined from this original status quo so that this work is a foundation or at least a basis on which the design is built on. Consequently, this State 1 informs the subsequent design process.
Phase 1: Discover
In Discover, the design team and stakeholders attempt to understand the full scope of the design challenge. To this end, the designer records the design challenge from the client’s perspective. This contributes to understanding the scope of the design project. The scope, however, does not rely on the issues the client has considered. It is also the designer’s responsibility to understand the full challenge including things that the client has not considered in order to come to the most complete and systematic understanding of the design challenge.
The phase begins with a divergent course of action where a good designer will challenge stakeholders with critical thinking skills to understand fully what the issues are and what issues maybe missing. Often, iteratively reframing the challenge in newer terms with deeper understanding and realizing long held beliefs are merely assumptions.
The Discover phase concludes with a convergence course of action where applying both critical- and systems-design thinking stakeholders home in on a definition of the solution which will govern the rest of this project. Designers will often facilitate other stakeholders in this process step through brainstorming, ideating and various visualizations to get everyone on the same page.
Basic goals
- Record State 1
Defining the design challenge/problem as the software makers currently see it. - Reframing the problem
Iteratively reframing the problem from multiple perspectives to attain a more holistic and systematic understanding of the design challenge. To facilitate this understanding, the designer reframes the design challenge. Reframing is iterative and takes place throughout the design process in most reflection activities in the design process. However, here in the Define phase, the shifting of perspectives, jointly redefining the problem and enlarging the scope has its most radical effect to the project. In this phase almost anything is still possible. After the reframing of the issues, a definite scope to the problem is drawn defining the constraints in which a design will operate. - Define Exploratory Evidence
Establishing goals for exploratory research - Conduct exploratory research
Establish and confirm the problem space by first expanding it to its greatest possible extent and then narrowing to establish a basis for a project scope. - Define the solution format
Through various systems thinking exercises and collecting co-creation of sketches and concepts with stakeholders, arrive at an agreement of a solution direction.
Basic Deliverables
Project Requirements: High level values, metrics and requirements the solution must meet to be deemed a success: this will also determine when the design is finished.
Problem statement: the concise description of the issues to be addressed and conditions that need to be improved. and identifying the inherent barriers that prevent a solution which the project must address. A problem statement includes: first, a description of the current situation (that is the situation that triggers the reason for the design project.); second, a description of the pain points or issues; and third, an explain who is affected and how.
Project goals: the definition of the solution and the metrics that will determine whether it will succeed for the software makers. This can include design guidelines and principles.
Models of the scope of the challenge: visualizations depicting the complete solution space and the underlying system of the solution, which will be used to inform the design challenge
Example activities
Some example activities, include:
- Project kick off with all key stakeholders which can be used to record State 1.
- Brainstorming/Ideation workshops to utilize critical design thinking to explore the problem space.
- Customer and Client interviews to understand other problems they have that the client may not be aware of. For example, the client may not be aware of a systematic or structural problem they have internally that prevents them from addressing the design challenge effectively.
Phase 2: Concept
The Concept phase starts with formative research following up on the exploratory research in the previous phase. This also includes a conceptual model or concept map of the possible solution. This model or map then serves as a reference to create multiple concepts of the possible solution. Then, these multiple concepts (5-10 are usual) are synthesized through iterative design in combination with formative-evaluative research. Finally, these multiple concepts are synthesized into a single conceptual model that will direct the creation and details of the design in the next step.
Goals
Conceptual design — the conceptual model and design approach that will be followed for the rest of the project.
Formative research — informing system workflow and conceptual direction (towards the end of the phase the research includes also evaluative aspects to evaluate the effectiveness of the concepts).
Solution definition — the response to the design problem is set in this phase. What type of solution or package of solutions is determined and ready for a conceptual design.
Deliverables
This phase starts with a divergent step including formative research. Formative research is targeted at deeper understandings of the problem in ways that help point to a solution. Various models and visualizations are often used; two common groups are concept maps and flow diagrams.
Concept models and/or maps — various abstract representations that help people to understand the scope of the solution independent of any concrete design. They are ways of getting people across disciplines and domains on the same page of what the design will address. One common useful conceptual model is like that outlined by Daniel Rosenberg in his UX Magic book, called the object-action model. Where all the objects are defined for a given system and their relations and actions are depicted to give an overview of the data and its interactions in one view. Another excellent conceptual model is the concept maps as described by Novak and Gowin (https://cmap.ihmc.us/). This site even offers free software (which may look outdated but nevertheless easily creates concept maps).
Flow diagrams, on the other hand try to envision taking the abstract concept map and applying it to a solution and what that would entail. Models such as:
- Journey maps
- Task analysis
- Other flow diagrams
help designers to synthesize these concepts. These types of deliverables aim to get stakeholders with a common understanding of a possible solution.
Conceptual designs — multiple concepts with accompanying documentation and then the detailed synthesized concept that will be used for the design solution
Low fidelity prototypes — low fidelity prototypes, storyboards or sketches that serve as a visualization of the concepts being presented throughout the
Problem delineation — the problem statement transformed into a general solution definition (a product, a service, a system of product and services, etc.)
Requirements document — requirements analyzed from research and design that list the needs of users, technical constraints, and needs from other stakeholders as well.
Step 3: Detail
The Detail Phase is the phase where the design team and stakeholders translate the conceptual design into a concrete design. Research becomes more evaluative but there are still formative details that need to be worked out. Likewise, in this phase, coordination with development resources becomes essential to the success of the design.
The detailed design phase begins with working out the abstract design into various detailed designs. These designs are iterated until validated by evaluative research. These validated designs are translated into design guidelines and principles, which will guide subsequent detailed designs. The evaluative research helps not only with validating designs but also further detailing requirements.
The detailed design step ends in a further convergence as the various worked out screens are worked out into interaction patterns, UX conventions, colors, typography and other detailed design elements. This step also is the building of some documentation that can be used to software developers in the creation of the software from the design.
Goals
Detailed design — Translation of concept into a stable design direction
Design documentation — the method the design is communicated to the software developers (in collaboration with the developers, sometimes it is as simple as an interactive prototype but more complex software may require more direct mentorship or documentation.
Evaluative research — research using established metrics to collect evidence of what is or is not working in the detailed design.
Deliverables
High fidelity prototypes — Detailed wireframe designs that approximate being pixel perfect. If no visual element is included (e.g. a voice interaction or automated interaction) then the wireframe could be in the form of a logic flow or other systems process diagrams.
Research Evidence — User research evidence and metric performance with analysis for supporting implementation or pointing to further design refinements.
Style Guide or Design System — the Design documentation specific to the needs of Design (for creating other designs) and Engineering (for implementing designs) also used for recording design guidelines and other design rationales.
Updated Requirements — Final major additions of user requirements (usually additional details of existing requirements) as well as a check that all previous requirements have been implemented or invalidated.
Step 4: Deliver
The Deliver Phase is the phase most commonly referred to, in the beginning as the “Devil is in the details” phase; due to all the unanticipated difficult issues that come up when developers try to implement the ideal design into a technical reality. These issues are difficult because as you have made more design decisions your margin of freedom becomes more limited to make a conceptually satisfying solution to new problems that crop up. But at the end of this phase, as you have solved those gnarly problems in accordance with your concept, then the phase is referred to as “God is in the details” because the elegant and compelling user experience you envisioned in Concept finally takes shape here.
Coordination and work with development become key to this phase. The phase begins with design and research, in lock step with development, scrambling to come up with elegant solutions and adjusting the design and the design system to the new reality. Design thinking sessions with engineering can also help come up with solutions to design problems that have a technical cause.
This phase ends on some agreed point in the development process, usually an MVP (minimal viable product) or other goal (e.g. certain metrics are achieved) or constraint (e.g. no more budget) is met.
Research at this stage is primarily to evaluate proposed solutions and help inform new solutions. At one point in implementation, the design stabilizes, and the development requires less assistance from design. At that moment, it’s usually the time for design to move on to the next project yet still be available for periodic mentoring or reviewing.
Goals
Achievement of design goals/metrics — Coordination with all the software makers that a point is reached where either the design goals have been met or ready for hand off to others for finishing.
Fit and finish for the design — the unexpected revisions and fine-grained details are worked out iteratively with development
Deliverables
Design assets — delivering UI elements and advice needed by engineering to implement designs
Tracking metrics and evidence — making sure that revisions to the design are not knocking the design off course.
Updating design documentation — updating design documentation as informed by development.
State 2
After phase 4 we come to state 2. In the good old days State 2 was a predictable targetable end state of delivering a final product. Victory was declared, a release party was held, and teams went on to their next technological battle. Now, most modern development is more organic and amorphous. Not just the speed of agile, but also supporting continuous improvements, or rather continuous releases and other rapid responses to technical and market needs. This keeps a very dedicated effort to keep the software alive and current. The design these days ends when agreed upon metrics or goals have been met, or resources run out, or other priorities take over.
This concludes the discussion of the details of the steps of the scalable design process. What makes this process scalable is its emphasis on the goals of the phase not its activities or methods which would be depending on numerous contextual situations. By concentrating on the goals, the designer is free to design their project and focus on including activities and deliverables that will meet the timeless goals of the project step. That covers the scalable aspect of the design process. In a future posting we will discuss the management of the design process or rather see it in action with a case study. But our next blog post will address the timeless-ness of the project. It will surprise no one when I state this process is not just based on my own 30+ years career in design but also on almost a century of design history, collective design experience, design education and theory.
The next blog post will give you a glimpse of those sources. You will see this design process is grounded in solid practice and proven design theory.